
Talavera - 1400 hours July 28, 1809
Carnage&GloryII - Napoleonic Battle Scenario

Battle of Talavera – July 27-28, 1809

The French deployment appeared particularly effective; all five front line infantry divisions were deployed en masse against the portion of the line occupied exclusively by the British and their German allies. Only a single French cavalry division opposed the Spanish positions, and the terrain occupied by the Spanish was well suited to defense, for the majority of the Spanish, their day would be quiet. This had the result that the odds were now strongly in numeric favor of the French, perhaps 2:1, in men, and slightly more in cannon.
Sir Arthur Wellesley defeats King Joseph Bonaparte
Historical Perspective – The Final Assault
The time is 1400 hours 28 July, 1809. The stage is set for the French to deliver their final attacks. The night before, Marshal Victor commanding the French I Corps d’Armee, had attempted to force the allies from their position by assaulting the extreme left of their line atop the Cerro de Medellin. This action would ensure that a battle would be fought on the 28th. Strategically the battle was unnecessary. The French felt assured that they had caught the Anglo-Spanish armies in a classic Napoleonic maneuver ‘sur les derrieres’. King Joseph’s forces would be the anvil against which Marshal Soult would strike with his hammer blow from the North and West. In time Wellington and Cuesta would be crushed. Unfortunately for the French, Marshal Victor had other ideas, the enemy was before him, and they must be attacked. He was even prepared to write the Emperor claiming cowardice on the parts of King Joseph and his military advisor Marshal Jourdan. With that threat, both Joseph and Jourdan felt it best to give Victor his way.
The French deployment appeared particularly effective; all five front line infantry divisions were deployed en masse against the portion of the line occupied exclusively by the British and their German allies. Only a single French cavalry division opposed the Spanish positions, and the terrain occupied by the Spanish was well suited to defense, for the majority of the Spanish, their day would be quiet. This had the result that the odds were now strongly in numeric favor of the French, perhaps 2:1, in men, and slightly more in cannon.
Victor’s night assault had been a disaster; the combination of poor tactical deployment and the dark resulted in their bloody repulse. But this did not deter Victor, and the following morning he again forced the issue by throwing his troops into engagement with the British troops on the Cerro de Medellin. This assault was as poorly coordinated as had been the one the night before, and on this occasion the British were more prepared for it. Victor’s three regiments, were assaulted in front and flank, and sent reeling down the slopes back upon their supports. Oman states that the regiments were deployed in massive regimental columns, three battalion double company columns side-by-side, six companies wide and three deep. It seems far more likely that the actual deployment was two or three battalions in line one behind the other. When the British position was located, the rear battalions would file to left and right to extend the line and engage in a firefight preparatory to the bayonet charge. This formation would be seen again at Waterloo, when employed by D’Erlon, and gave the impression of a large column. Provided adequate cavalry support was available, or the terrain was unsuitable for enemy cavalry, the formation, though slow, would be a reasonable method of ensuring that the lead battalion could employ it’s full strength either in volley fire or with bayonet once contact with the enemy was made. It made most sense when an opponent chose to use reverse slope tactics.
Following Victor’s failed morning assault, all went quiet for a time, in fact Victor authorized his troops to prepare their food and eat before any recommencement of action. As time past, troops from both sides fraternized at the Portina stream, and both sides negotiated for their wounded to be brought back to their own lines. The only substantial redeployment came with the movement of the Spanish 5th infantry division, and 2nd cavalry division to the area north of the Cerro de Medellin. This movement was affected between 1000 and 1400 hours, and gave some security against a potential French flank movement against the Cerro. The British position was not a typical Wellingtonian style deployment. There was to be little opportunity for the reverse slope tactic, as seen at Waterloo. For a majority of his line, the troops were arrayed in the open, in full view of the French infantry and artillery. This deployment would result in many unnecessary casualties. As the heat of the day subsided the French and their Confederation allies began to rouse, the final assault was about to commence.
 |
| The GM goes over the scenario! |
 |
| The players listen! French on the Left, Anglo-Spanish Right! |
Historical Analysis:
On paper the French were outnumbered, but the allies were a composite force, made up of British, German and Spanish troops, all of varying quality. Even the British could not, at
this stage of the war, be considered a veteran force. The Spanish, although enthusiastic, were very poorly officered, and as a result were all too prone to over-reaction and panic. The French forces, on the other hand, were generally of much higher quality. Many regiments had seen glorious action with the Grand Armee throughout 1805, 1806 and 1807. Perhaps the weakest element in the French host was the ‘German’ division of Sebastiani’s IV Corps. But even this force had some fine regiments, including those from Hesse-Darmstadt, Baden and Nassau.
this stage of the war, be considered a veteran force. The Spanish, although enthusiastic, were very poorly officered, and as a result were all too prone to over-reaction and panic. The French forces, on the other hand, were generally of much higher quality. Many regiments had seen glorious action with the Grand Armee throughout 1805, 1806 and 1807. Perhaps the weakest element in the French host was the ‘German’ division of Sebastiani’s IV Corps. But even this force had some fine regiments, including those from Hesse-Darmstadt, Baden and Nassau.
The French army at Talavera was organized on the relatively new six-company basis, one grenadier, one voltigeur and four fusiliers, with each regiment fielding two or three battalions. This was not the organization that had been so successful at Austerlitz, Jena and Friedland, the battalions were slightly smaller, and would have felt the effects of combat attrition more quickly. The voltigeurs were highly skilled in skirmish tactics but they were to meet their match in the British light companies supplemented with rifle companies. King Joseph had ample cavalry, but the nature of the terrain, interspersed with streams, dry watercourses, and many groves of olives and vines, severely hampered their ability to deploy effectively. Late in the day, the Anglo/German cavalry brigade, commanded by Anson, would suffer because of the unpredictable nature of the terrain.
The British army was still relatively untried in the European theatre. The successes achieved so far had been against troops of much lower caliber than those commanded by Victor and Sebastiani at Talavera. Period memoirs attest to the, probable exclusive, British use of two-rank formations whilst in the field. To ensure that the frontages of the battalions were manageable, larger formations, those closer to establishment strength, would often break into two wings. Each wing could fight independent of one another or in mutual support. The right wing would be formed of five companies, composed of four center companies and one grenadier. Whilst the left wing, in the absence of the light company, would be formed of the remaining four center platoons. The right wing would carry the Union or Kings color, and the left the Regimental color. The two-rank formation, though capable engaging all it’s muskets during volley fire, would not have had the resilience of the more typically seen Continental three-rank deep formation. To counter this potential flaw, the British would evolve tactics that ensured that they did not unnecessarily expose their formations to attritional engagements, such as protracted firefights, and that they would seek the shelter of a reverse slope whenever possible. Deploying a heavy skirmish screen to shield the two-rank close order formations was also an effective tactic. The evolutions of these tactics were in their earliest stages at Talavera, and most significantly the British saw no reason to employ reverse slope tactics. One possible reason for this was the relative high establishment strengths of many of the British battalions. Certainly the larger units could theoretically absorb more attritional losses, alternatively, if may have simply been inexperience on the part of the British higher command.
 |
| My assigned Brigade during the battle! Brigade Laplanne |
Tactical Formations:
French:
Maneuver on road – March Column
Maneuver over open terrain – Double Company or company column
Engagement – Line
Defense against cavalry – Square
Open order formation is restricted to Light troops and French
battalions rated C, C+, B-, B, B+, A-, A and A+ only.
Maneuver over open terrain – Double Company or company column
Engagement – Line
Defense against cavalry – Square
Open order formation is restricted to Light troops and French
battalions rated C, C+, B-, B, B+, A-, A and A+ only.
All infantry have integral skirmish companies, and may use skirmish fire against any enemy formation.
The French offensive tactics were highly refined by this period, and typically saw a general engagement of an enemy position with skirmish and artillery in an effort to weaken the close order formations resolve. The skirmishers would screen the movements of their battalion columns that would maneuver to exploit the enemy positions weak spots. If the enemy had been effectively weakened by skirmish and artillery fire, the French columns would attempt to close with the enemy without deploying to line. However, if the enemy close order formations failed to be sufficiently weakened, the French close order
formations could deploy to line and engage in a brief firefight, before closing upon the enemy with the bayonet. Clausewitz would refer to these two phases of the engagement as the ‘destructive’ and the ‘decisive’ phases. The former was the ‘softening’ of the enemy, and would require time and patience, the latter was the ‘breaking’ of the enemy, and was preferably achieved with the bayonet and/or the sword.
formations could deploy to line and engage in a brief firefight, before closing upon the enemy with the bayonet. Clausewitz would refer to these two phases of the engagement as the ‘destructive’ and the ‘decisive’ phases. The former was the ‘softening’ of the enemy, and would require time and patience, the latter was the ‘breaking’ of the enemy, and was preferably achieved with the bayonet and/or the sword.
When confronted by reverse slope tactics, the French may employ regimental columns. This formation is represented as follows; each battalion adopts line formation, and advances in close order one behind the other. The rear battalions may double to left and right to extend the line once in close contact with the enemy. The lead battalion would be the 2nd, the 1st following filing to the right, and the third in rear filing to the left. The movement rate of a regimental column will be the same as that in line, and shall be considered as 300 paces. The second and third battalions in such a formation will be considered as bounce through targets, if the lead battalion in targeted by artillery.
Anglo-Spanish:
Maneuver on road – March Column
Maneuver over open terrain – Company column
Engagement – Line
Defense against cavalry – Square
Open order formation is restricted to Light troops only.
The British Foot regiments were by General Orders, required to detach their integral light companies and concentrate them with a rifle armed company [typically of the 5/60th Foot], at the brigade level. This combined light battalion would operate as the protective screen for the parent brigade and, on occasions, be deployed within buildings or disruptive terrain, such as woods, orchards and restrictive terrain, unsuitable for close order formations. The British therefore did not have an integral skirmish screen, that would operate in direct concert with the parent battalion, as was the case with the French.
The British defensive, tactic was to fire one or two volleys’ at close range, cry huzzah three times and charge through the smoke with bayonets fixed. The sight and sound of the charging redcoats was normally quite enough to reduce the resolve of any opponent who had already been disordered by the volley fire, and the result would be a precipitous retreat on their part.
The Spanish defensive tactic was simple, to engage the enemy with volley fire as early as possible, and present a shield of lead. To simulate this it is important that the Spanish not withhold their fire to effective range, but engage any threat within 200 paces of their defensive lines. Spanish troops do not have integral skirmish companies.
Season: Summer
Weather: Clear
Ground conditions: Good
Start Time: 1400
Terrain:
Ground is typically gently rolling arable or cultivated, with open wooded areas and villages. Overhead artillery fire is only permitted from one unit to another when the firer or target
is located on or above equal elevations, both of which are higher than the intervening friendly or enemy unit. No overhead fire is permitted within canister range.
Watercourses [Portina Stream] – fordable, linear obstacle. Due to the broken nature of the ground either side of the Portina, units must input a formation change from current formation to the same or different formation to cross, this will impart the necessary disorder and fatigue.
Stone Walls – Are considered as heavy linear obstacles for defensive and offensive purposes [defending unit must physically touch the terrain feature]. Cavalry and infantry cannot charge across a stone wall, if the wall is physically defended, or the wall is positioned between the charger and target. Infantry can charge a unit defending a wall. Deduct 150 paces from normal or charge movement for infantry and 300 paces for cavalry.
Olive Groves – Light woods, movement within groves shall be considered as disruptive terrain, unless on roads or tracks, however a unit must be limbered or in March Column to
avoid the disruptive terrain. Troops in close order, must input ‘Crossing Disruptive Terrain’ and move at half normal rates. Troops in open order move at half normal rates. For defensive purposes the woods are considered Light cover, for offensive purposes [charging troops as target] they provide no cover.
Line of Sight – is obstructed by built-up areas, not individual buildings, woods and hills only. LOS is restricted to 200 within olive groves.
Pajar de Vergara Redoubt – Is an unfinished open fieldwork, and can be occupied by two combat units at any one time. But only four attacking units can be coordinated to attack the position in any one turn. The fieldwork is considered as heavy linear obstacles for defensive and offensive purposes [defending unit must physically touch the terrain feature]. Cavalry and infantry cannot charge across the redoubt, if the fieldwork is physically defended, or the fieldwork is positioned between the charger and target. Infantry can charge a unit defending the fieldwork. Deduct 150 paces from normal or charge movement for infantry and 300 paces for cavalry.
Troops must be in March Column or limbered to gain road advantage.
Anglo-Spanish:
Maneuver on road – March Column
Maneuver over open terrain – Company column
Engagement – Line
Defense against cavalry – Square
Open order formation is restricted to Light troops only.
The British Foot regiments were by General Orders, required to detach their integral light companies and concentrate them with a rifle armed company [typically of the 5/60th Foot], at the brigade level. This combined light battalion would operate as the protective screen for the parent brigade and, on occasions, be deployed within buildings or disruptive terrain, such as woods, orchards and restrictive terrain, unsuitable for close order formations. The British therefore did not have an integral skirmish screen, that would operate in direct concert with the parent battalion, as was the case with the French.
The British defensive, tactic was to fire one or two volleys’ at close range, cry huzzah three times and charge through the smoke with bayonets fixed. The sight and sound of the charging redcoats was normally quite enough to reduce the resolve of any opponent who had already been disordered by the volley fire, and the result would be a precipitous retreat on their part.
The Spanish defensive tactic was simple, to engage the enemy with volley fire as early as possible, and present a shield of lead. To simulate this it is important that the Spanish not withhold their fire to effective range, but engage any threat within 200 paces of their defensive lines. Spanish troops do not have integral skirmish companies.
Environmental Conditions:
Season: Summer
Weather: Clear
Ground conditions: Good
Start Time: 1400
Terrain:
Ground is typically gently rolling arable or cultivated, with open wooded areas and villages. Overhead artillery fire is only permitted from one unit to another when the firer or target
is located on or above equal elevations, both of which are higher than the intervening friendly or enemy unit. No overhead fire is permitted within canister range.
Watercourses [Portina Stream] – fordable, linear obstacle. Due to the broken nature of the ground either side of the Portina, units must input a formation change from current formation to the same or different formation to cross, this will impart the necessary disorder and fatigue.
Stone Walls – Are considered as heavy linear obstacles for defensive and offensive purposes [defending unit must physically touch the terrain feature]. Cavalry and infantry cannot charge across a stone wall, if the wall is physically defended, or the wall is positioned between the charger and target. Infantry can charge a unit defending a wall. Deduct 150 paces from normal or charge movement for infantry and 300 paces for cavalry.
Olive Groves – Light woods, movement within groves shall be considered as disruptive terrain, unless on roads or tracks, however a unit must be limbered or in March Column to
avoid the disruptive terrain. Troops in close order, must input ‘Crossing Disruptive Terrain’ and move at half normal rates. Troops in open order move at half normal rates. For defensive purposes the woods are considered Light cover, for offensive purposes [charging troops as target] they provide no cover.
Line of Sight – is obstructed by built-up areas, not individual buildings, woods and hills only. LOS is restricted to 200 within olive groves.
Pajar de Vergara Redoubt – Is an unfinished open fieldwork, and can be occupied by two combat units at any one time. But only four attacking units can be coordinated to attack the position in any one turn. The fieldwork is considered as heavy linear obstacles for defensive and offensive purposes [defending unit must physically touch the terrain feature]. Cavalry and infantry cannot charge across the redoubt, if the fieldwork is physically defended, or the fieldwork is positioned between the charger and target. Infantry can charge a unit defending the fieldwork. Deduct 150 paces from normal or charge movement for infantry and 300 paces for cavalry.
Troops must be in March Column or limbered to gain road advantage.
 |
| View from Anglo-Spanish Left! (French Right flank) |
 |
| View of center (Olive groves)! |
 |
| View from Anglo-Spanish Right! (French Left flank) |
 |
| View from French Left! (Anglo-Spanish Right flank) |
 |
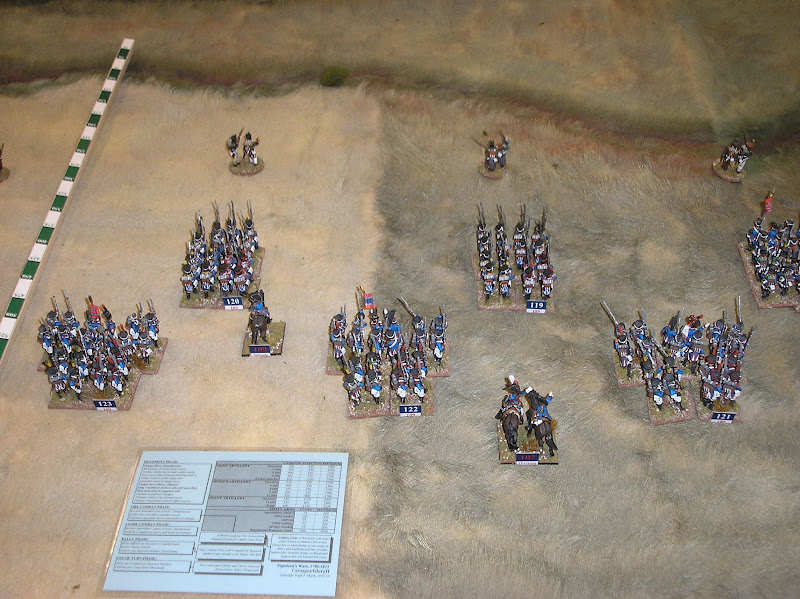
| The center to the left of my brigade (the stick)! |
 |
| View from French Right! (Anglo-Spanish Left flank) |
 |
| This will be the French forces Main Objective! Cerro de Medellin |
 |
| French cavalry that will never see the battlefield, but the Anglo-Spanish don't know this! |
 |
| Polish reserves. Part of the reserve from Madrid. They will never see the battlefield, but the Anglo-Spanish don't know this as well! |
 |
| And once again I get my old friend "Murphy"! Placed directly in front of my forces and I have no artillery to counter it with. Along with the KGL's bigger battalions. (Merde). |
 |
| The overall view of my opposition at the start! |
 |
| The prize is to my Right (Cerro de Medellin) along with our Div gun's as part of a Grand Battery! |
 |
| And to my Left is the CENTER! Let the games begin. |
FRENCH FORCES;
Army Joseph Bonaparte
[ 101] General Joseph Bonaparte - Active C [1200 paces]
[ 101] General Joseph Bonaparte - Active C [1200 paces]
Staff Jourdan
[ 102] Marechal d'Empire Jourdan - Active C+ [650 paces]
[ 102] Marechal d'Empire Jourdan - Active C+ [650 paces]
Corps Claude-Victor Perrin
[ 103] Marechal d'Empire Claude-Victor Perrin - Active B- [1100 paces]
[ 101] 6/8me Artillerie a Pied 0/ 193 [ 8] D+
[ 102] 2/6me Artillerie a Cheval 0/ 156 [ 6] C+
[ 103] Marechal d'Empire Claude-Victor Perrin - Active B- [1100 paces]
[ 101] 6/8me Artillerie a Pied 0/ 193 [ 8] D+
[ 102] 2/6me Artillerie a Cheval 0/ 156 [ 6] C+
Division Pierre-Bellon Lapisse
[ 107] General de Division Pierre-Bellon Lapisse - Active C- [650 paces]
[ 112] 1/8me Artillerie a Pied 0/ 195 [ 8] D+
[ 107] General de Division Pierre-Bellon Lapisse - Active C- [650 paces]
[ 112] 1/8me Artillerie a Pied 0/ 195 [ 8] D+
Brigade Solignac
[ 108] General de Brigade Solignac - Active C [450 paces]
[ 113] 1/8me Regt.de Ligne 0/ 551 B- [sk]
[ 114] 2/8me Regt.de Ligne 0/ 563 B- [sk]
[ 115] 3/8me Regt.de Ligne 0/ 532 C- [sk]
[ 116] 1/54me Regt.de Ligne 0/ 679 C [sk]
[ 117] 2/54me Regt.de Ligne 0/ 696 C [sk]
[ 118] 3/54me Regt.de Ligne 0/ 652 C+ [sk]
Brigade Laplanne
[ 109] General de Brigade Laplanne - Active C- [350 paces]
[ 119] 1/16me Regt.de Leger 0/ 589 D+ [sk]
[ 120] 2/16me Regt.de Leger 0/ 598 D+ [sk]
[ 121] 1/45me Regt.de Ligne 0/ 646 C- [sk]
[ 122] 2/45me Regt.de Ligne 0/ 599 C+ [sk]
[ 123] 3/45me Regt.de Ligne 0/ 611 C [sk]
[ 109] General de Brigade Laplanne - Active C- [350 paces]
[ 119] 1/16me Regt.de Leger 0/ 589 D+ [sk]
[ 120] 2/16me Regt.de Leger 0/ 598 D+ [sk]
[ 121] 1/45me Regt.de Ligne 0/ 646 C- [sk]
[ 122] 2/45me Regt.de Ligne 0/ 599 C+ [sk]
[ 123] 3/45me Regt.de Ligne 0/ 611 C [sk]
Division Eugene Villatte
[ 110] General de Division Eugene Villatte - Active B [950 paces]
[ 124] 2/8me Artillerie a Pied 0/ 198 [ 8] CBrigade
[ 110] General de Division Eugene Villatte - Active B [950 paces]
[ 124] 2/8me Artillerie a Pied 0/ 198 [ 8] CBrigade
Baron Louis-Victorin Cassagne
[ 111] General de Brigade Baron Louis-Victorin Cassagne - Active C+ [450 paces]
[ 125] 1/27me Regt.de Leger 0/ 539 B- [sk]
[ 126] 2/27me Regt.de Leger 0/ 580 C- [sk]
[ 127] 1/63me Regt.de Ligne 0/ 369 C+ [sk]
[ 128] 2/63me Regt.de Ligne 0/ 375 C+ [sk]
[ 129] 3/63me Regt.de Ligne 0/ 367 C [sk]
[ 111] General de Brigade Baron Louis-Victorin Cassagne - Active C+ [450 paces]
[ 125] 1/27me Regt.de Leger 0/ 539 B- [sk]
[ 126] 2/27me Regt.de Leger 0/ 580 C- [sk]
[ 127] 1/63me Regt.de Ligne 0/ 369 C+ [sk]
[ 128] 2/63me Regt.de Ligne 0/ 375 C+ [sk]
[ 129] 3/63me Regt.de Ligne 0/ 367 C [sk]
Brigade Jacques Puthod
[ 112] General de Brigade Jacques Puthod - Active C [350 paces]
[ 130] 1/94me Regt.de Ligne 0/ 435 C- [sk]
[ 131] 2/94me Regt.de Ligne 0/ 434 C [sk]
[ 132] 3/94me Regt.de Ligne 0/ 441 C [sk]
[ 133] 1/95me Regt.de Ligne 0/ 447 B- [sk]
[ 134] 2/95me Regt.de Ligne 0/ 462 B- [sk]
[ 135] 3/95me Regt.de Ligne 0/ 453 C+ [sk]
Corps Comte Sebastiani
[ 114] General de Division Comte Sebastiani - Active B [1200 paces]
[ 142] 12/7me Artillerie a Pied 0/ 156 [ 6] D+
[ 114] General de Division Comte Sebastiani - Active B [1200 paces]
[ 142] 12/7me Artillerie a Pied 0/ 156 [ 6] D+
Division Louis Liger-Belair
[ 115] General de Brigade Louis Liger-Belair - Active C+ [650 paces]
[ 143] 5/7me Artillerie a Pied 0/ 142 [ 6] D+
[ 144] 1/58me Regt.de Ligne 0/ 566 C [sk]
[ 145] 2/58me Regt.de Ligne 0/ 579 B- [sk]
[ 146] 3/58me Regt.de Ligne 0/ 567 D+ [sk]
[ 147] 1/75me Regt.de Ligne 0/ 491 C [sk]
[ 148] 2/75me Regt.de Ligne 0/ 481 C+ [sk]
[ 149] 3/75me Regt.de Ligne 0/ 499 C- [sk]
Brigade Baron Jean-Pierre-Antoine Rey
[ 116] General de Brigade Baron Jean-Pierre-Antoine Rey - Active B+ [500 paces]
[ 150] 1/28me Regt.de Ligne 0/ 357 C- [sk]
[ 151] 2/28me Regt.de Ligne 0/ 369 B- [sk]
[ 152] 3/28me Regt.de Ligne 0/ 375 B- [sk]
[ 153] 1/32me Regt.de Ligne 0/ 665 D+ [sk]
[ 154] 2/32me Regt.de Ligne 0/ 609 C [sk]
[ 155] 3/32me Regt.de Ligne 0/ 650 C [sk]
Division Baron Jean-Francois Leval
[ 117] General de Division Baron Jean-Francois Leval - Active B- [875 paces]
Brigade Heinrich Freiherr von Porbeck
[ 118] Oberst Heinrich Freiherr von Porbeck - Active B [400 paces]
[ 156] III.Fuss Batterien Steinmetz 0/ 190 [ 8] C+
[ 157] I.von Harrant Nr.4 [Baden] 0/ 684 C+ [sk]
[ 158] II.von Harrant Nr.4 [Baden] 0/ 681 C+ [sk]
[ 159] I.Nassau IR Nr.2 0/ 473 D+ [sk]
[ 160] II.Nassau IR Nr.2 0/ 458 C [sk]
[ 118] Oberst Heinrich Freiherr von Porbeck - Active B [400 paces]
[ 156] III.Fuss Batterien Steinmetz 0/ 190 [ 8] C+
[ 157] I.von Harrant Nr.4 [Baden] 0/ 684 C+ [sk]
[ 158] II.von Harrant Nr.4 [Baden] 0/ 681 C+ [sk]
[ 159] I.Nassau IR Nr.2 0/ 473 D+ [sk]
[ 160] II.Nassau IR Nr.2 0/ 458 C [sk]
Brigade Feliks Potocki
[ 121] Oberst Feliks Potocki - Active C [350 paces]
[ 167] I.IR Nr.4 [Polish] 0/ 901 B- [sk]
[ 168] II.IR Nr.4 [Polish] 0/ 973 C [sk]
[ 121] Oberst Feliks Potocki - Active C [350 paces]
[ 167] I.IR Nr.4 [Polish] 0/ 901 B- [sk]
[ 168] II.IR Nr.4 [Polish] 0/ 973 C [sk]
Brigade Balthazard Grandjean
[ 119] General de Brigade Balthazard Grandjean - Active C [350 paces]
[ 161] III.Fuss Batterien Venator 0/ 206 [ 8] C-
[ 162] I/Erbprinz Brigade 0/ 398 B- [sk]
[ 163] Rheinbund Bttn von Frankfort 0/ 504 C
[ 119] General de Brigade Balthazard Grandjean - Active C [350 paces]
[ 161] III.Fuss Batterien Venator 0/ 206 [ 8] C-
[ 162] I/Erbprinz Brigade 0/ 398 B- [sk]
[ 163] Rheinbund Bttn von Frankfort 0/ 504 C
Brigade David-Hendrik Chasse
[ 120] Generalmajor David-Hendrik Chasse - Active C [350 paces]
[ 164] 3me Artillerie a Cheval Trip 0/ 100 [ 4] C
[ 165] I.2me Regt.Linie 0/ 513 B- [sk]
[ 166] I.3me Regt.Linie 0/ 539 C [sk]
[ 120] Generalmajor David-Hendrik Chasse - Active C [350 paces]
[ 164] 3me Artillerie a Cheval Trip 0/ 100 [ 4] C
[ 165] I.2me Regt.Linie 0/ 513 B- [sk]
[ 166] I.3me Regt.Linie 0/ 539 C [sk]
Division Latour Maubourg
[ 125] General de Division Latour Maubourg - Active B- [725 paces]
[ 176] 2/5me Artillerie a Cheval 0/ 145 [ 6] BBrigade
[ 125] General de Division Latour Maubourg - Active B- [725 paces]
[ 176] 2/5me Artillerie a Cheval 0/ 145 [ 6] BBrigade
Perreymond
[ 126] General de Brigade Perreymond - Active C [450 paces]
[ 177] 1e Regt.de Dragons 0/ 325 C
[ 178] 1.2me Regt.de Dragons 0/ 243 C
[ 179] 2.2me Regt.de Dragons 0/ 235 C
[ 126] General de Brigade Perreymond - Active C [450 paces]
[ 177] 1e Regt.de Dragons 0/ 325 C
[ 178] 1.2me Regt.de Dragons 0/ 243 C
[ 179] 2.2me Regt.de Dragons 0/ 235 C
Brigade Baron d'Oullemberg
[ 127] General de Brigade Baron d'Oullemberg - Active C [400 paces]
[ 180] 4me Regt.de Dragons 0/ 425 C+
[ 181] 1.9me Regt.de Dragons 0/ 249 B-
[ 182] 2.9me Regt.de Dragons 0/ 229 BBrigade
[ 127] General de Brigade Baron d'Oullemberg - Active C [400 paces]
[ 180] 4me Regt.de Dragons 0/ 425 C+
[ 181] 1.9me Regt.de Dragons 0/ 249 B-
[ 182] 2.9me Regt.de Dragons 0/ 229 BBrigade
Baron Digeon
[ 128] General de Brigade Baron Digeon - Active C- [350 paces]
[ 183] 14me Regt.de Dragons 0/ 428 C+
[ 184] 1.26me Regt.de Dragons 0/ 282 D+
[ 185] 2.26me Regt.de Dragons 0/ 266 D+
[ 128] General de Brigade Baron Digeon - Active C- [350 paces]
[ 183] 14me Regt.de Dragons 0/ 428 C+
[ 184] 1.26me Regt.de Dragons 0/ 282 D+
[ 185] 2.26me Regt.de Dragons 0/ 266 D+
Strengths:
losses/active
0/ 23950 Bayonets
0/ 2682 Sabres
0/ 1681 Artillerists
0/ 68 Cannon
0/ 28313 Total of all arms
53 Standards present
losses/active
0/ 23950 Bayonets
0/ 2682 Sabres
0/ 1681 Artillerists
0/ 68 Cannon
0/ 28313 Total of all arms
53 Standards present
Victory Conditions - French:
Inflict losses on the Allies [one and a half points for every one point of army morale loss to the Allies]. Secure and hold defensive works at Para de Vergara [15 points], Cerro de Medellin [25 points]. and break defensive line south of Cerro up to defensive works [20 points].
If the French achieves 50 points towards their tactical objectives and the Anglo-Spanish record a major victory, this will be reduced to a minor victory, and if the Anglo-Spanish records a minor victory, this will be reduced to an inconclusive action.
If the French achieve more than 50 points towards their tactical objectives and they record a minor victory, this will be increased to a major victory, and if the result is an inconclusive action, this will be increased to a minor victory.

Army Gregorio de la Cuesta
[ 519] Lieutenant General Gregorio de la Cuesta - Active C- [1000 paces]
[ 534] Colonel Jose Maria de Lastres - Active C [225 paces]
Victory Conditions - Anglo-Spanish:
Inflict losses on the French [0ne point for every one point of army morale loss to the French].
Retain possession of defensive works at Para de Vergara [20 points], Cerro deMedellin [35 points] and line of defense south of Cerro up to defensive works [25 points].
If the Anglo-Spanish force achieves 50 points toward their tactical objectives and the French record a major victory, this will be reduced to a minor victory, and if the French record a minor victory, this will be reduced to an inconclusive action.
If the Anglo-Spanish achieve more than 50 points towards their tactical objectives and they record a minor victory, this will be increased to a major victory, and if the result is an inconclusive action, this will be increased to a minor victory.
ANGLO-SPANISH FORCES;
Army Sir Arthur Coley Wellesley
[ 501] Lieutenant General Sir Arthur Coley Wellesley - Active B [1300 paces]
[ 501] Lieutenant General Sir Arthur Coley Wellesley - Active B [1300 paces]
Brigade Howorth
[ 502] Major General Howorth - Active C- [350 paces]
[ 502] Major General Howorth - Active C- [350 paces]
Division Sir John Cope Sherbrooke
[ 503] Major General Sir John Cope Sherbrooke - Active C+ [875 paces]
[ 502] Elliott's Bde [1/2 RFA] 0/ 147 [ 6] C+
[ 503] Sillery's Bde [6/7 RFA] 0/ 149 [ 6] D+
[ 503] Major General Sir John Cope Sherbrooke - Active C+ [875 paces]
[ 502] Elliott's Bde [1/2 RFA] 0/ 147 [ 6] C+
[ 503] Sillery's Bde [6/7 RFA] 0/ 149 [ 6] D+
Brigade Henry Fred Campbell
[ 504] Brigadier General Henry Fred Campbell - Active C- [350 paces]
[ 506] L.1/2nd Foot Guards 0/ 399 C-
[ 507] R.1/2nd Foot Guards 0/ 499 C-
[ 508] L.1/3rd Foot Guards 0/ 419 C
[ 509] R.1/3rd Foot Guards 0/ 523 C
[ 510] 1.1st Dn Light Battalion 0/ 463 B [sk]
[ 504] Brigadier General Henry Fred Campbell - Active C- [350 paces]
[ 506] L.1/2nd Foot Guards 0/ 399 C-
[ 507] R.1/2nd Foot Guards 0/ 499 C-
[ 508] L.1/3rd Foot Guards 0/ 419 C
[ 509] R.1/3rd Foot Guards 0/ 523 C
[ 510] 1.1st Dn Light Battalion 0/ 463 B [sk]
Brigade Sir Alan Cameron of Erracht
[ 505] Brigadier General Sir Alan Cameron of Erracht - Active C+ [300 paces]
[ 511] 1/61st [South Gloucestershire] 0/ 724 C
[ 512] 2/83rd Foot 0/ 504 D+
[ 505] Brigadier General Sir Alan Cameron of Erracht - Active C+ [300 paces]
[ 511] 1/61st [South Gloucestershire] 0/ 724 C
[ 512] 2/83rd Foot 0/ 504 D+
Brigade Ernst E.K. Langwerth
[ 506] Brigadier General Ernst E.K. Langwerth - Active C- [300 paces]
[ 513] 1st KGL Battalion 0/ 591 C-
[ 514] 2nd KGL Battalion 0/ 658 C+
[ 515] 2.1st Dn Light Battalion 0/ 362 B [sk]
[ 506] Brigadier General Ernst E.K. Langwerth - Active C- [300 paces]
[ 513] 1st KGL Battalion 0/ 591 C-
[ 514] 2nd KGL Battalion 0/ 658 C+
[ 515] 2.1st Dn Light Battalion 0/ 362 B [sk]
Brigade Sigismund von Lowe
[ 507] Brigadier General Sigismund von Lowe - Active B- [500 paces]
[ 516] 5th KGL Battalion 0/ 549 C+
[ 517] 7th KGL Battalion 0/ 501 C
[ 507] Brigadier General Sigismund von Lowe - Active B- [500 paces]
[ 516] 5th KGL Battalion 0/ 549 C+
[ 517] 7th KGL Battalion 0/ 501 C
Division Sir Rowland Hill
[ 508] Major General Sir Rowland Hill - Active B [875 paces]
[ 504] 1st KGL Foot Art. [Rettberg] 0/ 148 [ 6] C-
[ 505] 2nd KGL Foot Art. [Heise] 0/ 151 [ 6] C+
[ 549] 1/2nd Artillery A [Spanish] 0/ 52 [ 2] D
[ 508] Major General Sir Rowland Hill - Active B [875 paces]
[ 504] 1st KGL Foot Art. [Rettberg] 0/ 148 [ 6] C-
[ 505] 2nd KGL Foot Art. [Heise] 0/ 151 [ 6] C+
[ 549] 1/2nd Artillery A [Spanish] 0/ 52 [ 2] D
Brigade Christopher Tilson
[ 509] Brigadier General Christopher Tilson - Active C [300 paces]
[ 518] 1/3rd [The Buffs] 0/ 688 C+
[ 519] 2/48th [Northamptonshire] 0/ 526 C
[ 520] 2/66th [Berkshire] 0/ 480 D+
[ 521] 2nd Dn Light Battalion 0/ 513 C [sk]
[ 509] Brigadier General Christopher Tilson - Active C [300 paces]
[ 518] 1/3rd [The Buffs] 0/ 688 C+
[ 519] 2/48th [Northamptonshire] 0/ 526 C
[ 520] 2/66th [Berkshire] 0/ 480 D+
[ 521] 2nd Dn Light Battalion 0/ 513 C [sk]
Brigade Richard Stewart
[ 510] Brigadier General Richard Stewart - Active C [300 paces]
[ 522] 29th [Worcestershire] 0/ 538 D
[ 523] 1/48th [Northamptonshire] 0/ 726 C-
[ 524] 1st Battalion Detachments 0/ 548 CDivision
[ 510] Brigadier General Richard Stewart - Active C [300 paces]
[ 522] 29th [Worcestershire] 0/ 538 D
[ 523] 1/48th [Northamptonshire] 0/ 726 C-
[ 524] 1st Battalion Detachments 0/ 548 CDivision
Sir Alexander Mackenzie
[ 511] Lieutenant General Sir Alexander Mackenzie - Active D+ [650 paces]
[ 525] 2/24th [Warwickshire] 0/ 757 D+
[ 526] 2/31st [Huntingdonshire] 0/ 708 D+
[ 527] 1/45th [Nottinghamshire] 0/ 729 CBrigade
[ 511] Lieutenant General Sir Alexander Mackenzie - Active D+ [650 paces]
[ 525] 2/24th [Warwickshire] 0/ 757 D+
[ 526] 2/31st [Huntingdonshire] 0/ 708 D+
[ 527] 1/45th [Nottinghamshire] 0/ 729 CBrigade
Sir Rufane Shaw Donkin
[ 512] Brigadier General Sir Rufane Shaw Donkin - Active C- [300 paces]
[ 528] 2/87th [P of Wales Own Irish] 0/ 588 B-
[ 529] 1/88th [Connaught Rangers] 0/ 589 C+
[ 530] 3rd Dn Light Battalion 0/ 494 B- [sk]
[ 512] Brigadier General Sir Rufane Shaw Donkin - Active C- [300 paces]
[ 528] 2/87th [P of Wales Own Irish] 0/ 588 B-
[ 529] 1/88th [Connaught Rangers] 0/ 589 C+
[ 530] 3rd Dn Light Battalion 0/ 494 B- [sk]
Division Sir Alexander Campbell
[ 513] Lieutenant General Sir Alexander Campbell - Active C+ [875 paces]
[ 501] Lawson's Bde [7/8 RFA] 0/ 156 [ 6] C
[ 531] 2/7th [Royal Fusiliers] 0/ 417 C+
[ 532] 2/53rd [West Shropshire] 0/ 512 B-
[ 533] 4th Dn Light Battalion 0/ 417 B- [sk]
[ 550] 1/2nd Artillery B [Spanish] 0/ 100 [ 4] D
[ 513] Lieutenant General Sir Alexander Campbell - Active C+ [875 paces]
[ 501] Lawson's Bde [7/8 RFA] 0/ 156 [ 6] C
[ 531] 2/7th [Royal Fusiliers] 0/ 417 C+
[ 532] 2/53rd [West Shropshire] 0/ 512 B-
[ 533] 4th Dn Light Battalion 0/ 417 B- [sk]
[ 550] 1/2nd Artillery B [Spanish] 0/ 100 [ 4] D
Brigade James Kemmis
[ 514] Brigadier General James Kemmis - Active B- [350 paces]
[ 534] 1/40th [2nd Somersetshire] 0/ 688 C
[ 535] 97th Foot [Queen's Own] 0/ 468 C+
[ 536] 2nd Battalion Detachments 0/ 578 C+
[ 514] Brigadier General James Kemmis - Active B- [350 paces]
[ 534] 1/40th [2nd Somersetshire] 0/ 688 C
[ 535] 97th Foot [Queen's Own] 0/ 468 C+
[ 536] 2nd Battalion Detachments 0/ 578 C+
SPANISH FORCES;
Army Gregorio de la Cuesta
[ 519] Lieutenant General Gregorio de la Cuesta - Active C- [1000 paces]
Corps J.M.de Alos
[ 521] Major General J.M.de Alos - Active C [1100 paces]
[ 521] Major General J.M.de Alos - Active C [1100 paces]
Division Marques de Portago
[ 525] Major General Marques de Portago - Active B [950 paces]
[ 551] 1/4th Artillery [Spanish] 0/ 202 [ 8] C
[ 576] 1. IR de Badajoz 0/ 519 C-
[ 577] 2. IR de Badajoz 0/ 546 D
[ 578] 1er Batallon de Trujillo 0/ 405 C-
[ 579] 2o Bttn Vol. de Antequera 0/ 557 C-
[ 580] Imperial de Toledo 0/ 792 D-
[ 581] Provincial de Badajoz 0/ 577 D+
[ 582] Provincial de Guadix 0/ 562 D+
[ 583] 1er IR de Osuna 0/ 377 D+
[ 584] 2o IR de Osuna 0/ 381 D+
Regiment Ramon Garcia Linares
[ 526] Colonel Ramon Garcia Linares - Active B [250 paces]
[ 526] Colonel Ramon Garcia Linares - Active B [250 paces]
Corps Marquis de Malapina
[ 532] Major General Marquis de Malapina - Active C+ [1300 paces]
[ 532] Major General Marquis de Malapina - Active C+ [1300 paces]
Brigade Juan de Henestrosa
[ 533] Lieutenant General Juan de Henestrosa - Active B [400 paces]
[ 599] 1o HC Rey 0/ 348 C+
[ 600] 4o HC Infanta 0/ 230 CRegiment
Jose Maria de Lastres[ 533] Lieutenant General Juan de Henestrosa - Active B [400 paces]
[ 599] 1o HC Rey 0/ 348 C+
[ 600] 4o HC Infanta 0/ 230 CRegiment
[ 534] Colonel Jose Maria de Lastres - Active C [225 paces]
Strengths:
losses/active
0/ 21872 Bayonets
0/ 578 Sabres
0/ 1105 Artillerists
0/ 44 Cannon
0/ 23555 Total of all arms
59 Standards present
losses/active
0/ 21872 Bayonets
0/ 578 Sabres
0/ 1105 Artillerists
0/ 44 Cannon
0/ 23555 Total of all arms
59 Standards present
Victory Conditions - Anglo-Spanish:
Inflict losses on the French [0ne point for every one point of army morale loss to the French].
Retain possession of defensive works at Para de Vergara [20 points], Cerro deMedellin [35 points] and line of defense south of Cerro up to defensive works [25 points].
If the Anglo-Spanish force achieves 50 points toward their tactical objectives and the French record a major victory, this will be reduced to a minor victory, and if the French record a minor victory, this will be reduced to an inconclusive action.
If the Anglo-Spanish achieve more than 50 points towards their tactical objectives and they record a minor victory, this will be increased to a major victory, and if the result is an inconclusive action, this will be increased to a minor victory.
Will it be Victory or Defeat?
TO BE CONTINUED..........
Very nice setup!
ReplyDeleteAmazing table and an informed choice of battle. I have a few questions:
ReplyDeleteWhat scale are the figures and which manufacturers?
What rules are you using?
What is the man to figure scale ratio for the battle being used?
I see you have used fur (is it teddy bear fur?) for the boards - how did you achieve the rolling grassy fields look (what paints did you use on the fur etc)?
Whose make is the fur / where can I get some?
What did you use for the ridge / rolling hill?
The trees look fantastic - whose make are they?
The whole effect looks stunningly realistic, how did you achieve the dried stream / gully effect?
Napoleonic is my favourite period and I am about to start again in this period. This article and the game is inspirational, Well done to all those created the table, the painted figures and te whole battle. Awesome. Mnay thanks for sharing.
The scale are 25/28mm's. Some VICTRIX, ELITE, OLD GLORY, Etc..., Rules (C&GII) Carnage & Glory II, 1:30 Ratio. See tutorial on Yahoo Group for fur, etc... Trees hand made.
ReplyDeleteThank you Grognard1789 I shall have nosey on over at LesGrognards yahoo group.
Delete