Tuesday, August 30, 2011

American Wartime Museum’s Open House (Aug 20 - 21)!

I enjoyed this during my Vacation this month and thought I'd share it here with you all as well;


Saturday & Sunday, August 20th & 21st, 2011, 10:00 AM

very generation pays for freedom, sometimes at great cost. When the price is military conflict, the American people go to war, not just the armed forces. At home and abroad, Americans answer the call. These conflicts call for bravery, leadership, service, and sacrifice from millions of men, women, and families, and this immense effort transforms the participants and the nation.

The National Museum of Americans in Wartime™ is dedicated to telling this story of American’s courage and sacrifice in wartime and the ways in which the nation’s wars have changed the lives of its citizens.

Visitors will encounter the story indoors and out, in combat landscapes, computer interactives, operational tanks and planes, multimedia experiences, public programs, and exhibition galleries filled with thousands of historic artifacts. Together, they will offer every visitor a deeper understanding of the lives of their fellow Americans in wartime and the responsibilities of freedom

Opening Veterans Day, November 11, 2014
in Prince William County, Virginia
Virginia Museum of Military Vehicles;


VIRGINIA MUSEUM of MILITARY VEHICLES

Nokesville Road
Nokesville, VA 20181


Get Involved


Why become part of the Museum?

We need an army of volunteers, donors and supporters to make the American Wartime Museum a reality. Your support will make a real difference:
  • You can be part of a museum that is unlike any other in the nation.
  • You can help preserve the people, places and events of our nation’s wars from World War I to the present.
  • You can help tell the story of ordinary Americans who made extraordinary contributions to our nation.
  • You can help educate future generations of Americans about their unique heritage and their freedoms.

Whether you want to donate to the Museum or simply keep up-to-date on the latest news, we offer many ways for you to be involved and many incentives for your support.


Join the cause!

http://www.nmaw.org/get-involved/become-a-member/

The Battle of Montenotte, 1796 Shocking Conclusion!

Although the hills around Montenotte are thickly wooded, some of the valleys have open fields, like this area near Cascina Garbazzo. The author is unable to give a precise location, because he didn't know where he was when he took the shot. However, it is less than half a mile from the Cascina.


Moves:

Argenteau's attack precipitated an immediate counteroffensive by Bonaparte, who moved General of Division (MG) André Masséna's two divisions from Savona to the area of the Cadibona Pass. Satisfied that Beaulieu was too far to the east to intervene effectively, Bonaparte determined to crush Argenteau. He ordered MG Amédée Laharpe's division to join Rampon's force, making a total of 7,000 soldiers at Monte Negino. Masséna marched from Altare, up the left leg of the λ, with BG Philippe Romain Ménard's 4,000-man brigade. In order to reach their jumping off positions, the troops started at 2 am and marched in a rain storm. MG Pierre Augereau's division and other units concentrated near the Cadibona Pass.


The 3rd battalion of the Terzi IR # 16 marched all night to reach Montenotte at dawn. Argenteau deployed this unit, some Croats, and several detached companies from his other regiments to guard the Altare road. The rest of the Austrians still faced Monte Negino. One battalion of the Preiss IR # 24 arrived in the area but was not committed to the next day's battle.


Montenotte:

Fog shrouded the area at dawn on 12 April. When it cleared, several French cannons began firing from Monte Negino on the Austrians below them and Argenteau saw that he was confronted by a large force. Shortly afterward, Masséna's soldiers launched their attack on the weakly held Austrian right flank, swamping the defenders with superior numbers. Argenteau deployed the Stein and Pellegrini battalions under Lt. Col. Nesslinger to hold the center and assigned the two Archduke Anton battalions to defend the left flank on Monte Pra. Then he took the Alvinczi battalion to the rescue of the 3rd/Terzi battalion on his right flank.


While Masséna overwhelmed Argenteau's right, Laharpe fell on the Austrians defending Monte Pra. At first the Austrians conducted a stout defense. But Masséna's assault made such rapid progress that Argenteau ordered a retreat. The 3rd/Terzi battalion was nearly destroyed and Nesslinger's two battalions were badly cut up. In the Austrian retreat from Montenotte Superiore, the Alvinczi battalion provided the rear guard. The battalion had to fight its way out, losing its color and many soldiers. 


Argenteau's men barely cleared out of Montenotte Inferiore before Masséna's and Laharpe's flanking forces converged on the hamlet. By 9:30 am the battle was over.


Results:

The battle was General Bonaparte's first victory in the Montenotte Campaign. By the next morning, Argenteau reported only 700 men with the colors. The rest were lost in combat or scattered. Boycott-Brown presents French losses as light; a sampling of reports show that the 32nd Line, 51st Line, 75th Line, and 17th Light lost 10, 8, 27, and 19 casualties, respectively. The Austrians admitted losing 166 killed, 114 wounded, and 416 missing, for a total of 696.


Three historians assert that losses were more severe. Digby Smith wrote that the French suffered 800 killed, wounded, and missing, while the Austrians lost 2,500 killed, wounded, and captured, most of the casualties being prisoners. Gunther E. Rothenberg listed 2,500 Austrian casualties against 880 French. David G. Chandler also gives Austrian losses as 2,500, but lists no French losses.


A badly shaken Argenteau pulled his surviving soldiers back to cover Acqui, while other forces under Rukavina held Dego, about 6 km to the north-northeast of Montenotte. He sent an alarming dispatch to Beaulieu stating that his command was "almost completely destroyed". Bonaparte issued orders to exploit his success by widening the gap between the Austrian and Sardinian armies by thrusting west toward Millesimo and north toward Dego. The next actions were the Battle of Millesimo on 13 April and the Second Battle of Dego on 14–15 April.


The situation when we last left off was by turn 3 French forces were finally initially victorious. Only 5 turns were left in the game. "Vive La France"!!!

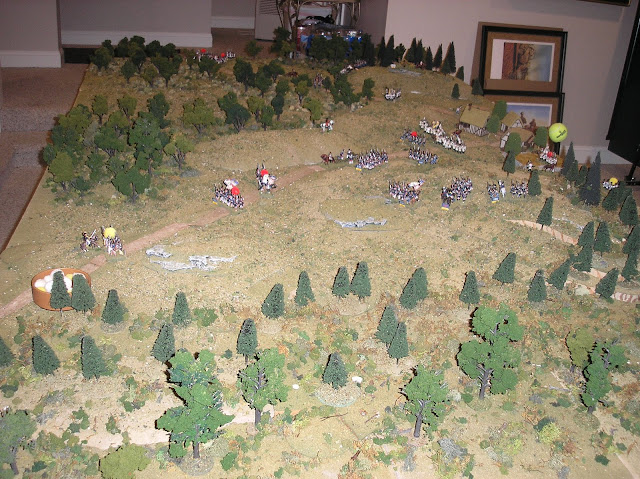
A broader view of the French Right flank at this time as Napoleon looks on and the Austrians react! It's all or nothing for the French on turn 4 I decide (Good or Bad decision). I'm charging everywhere!

The Left flank advances as well, if not only to make some room! These are "my best troops" (Enter Murphy), "were my best troops". My thought is they may get sacrificed, but they'll soften up the Austrians Horde (Biggest Battalion)?


I finally deploy my gun and charge in on the Left flank.

I deploy some light troops in the woods also to guard my Artillery's flank.

A broader view as I attempt to get my Artillery into action as well as my troops.

And from the Austrian perspective. It's make or break time for me.  "I'm good to go Right"?

Fearing the Right flank may do better the enemy shifts forces to reinforce the main road!

Using the same idea to soften them up I send in my only unit of cavalry!

Right flank from the Austrian perspective at this point in time. It appears "I'm winning the Battle!"

Aerial view of the action on my Right flank.

And of the entire table prior to my charges on the Right!

And from the other end (Left flank).

And so I "CHARGE IN", "No Gut's no Glory" and then time stood still forever it seemed!

My cavalry is Vaporized by Austrian fire and Artillery!!

I send in my two weakest units in the Center in a joint charge. They fail miserably too. Losing a leader!

My troops are also becoming fatigued and won't move without a leader "White" marker.

And the Left flank becomes a total mess.

Instead of numerous chances for Glory on both turns 4, 5 & 6. I got "DISASTER"!

The Austrian's defeat my Left flanks initial charge and counter charge my lines.

And any chance at "Victory" slowly melts away!

The same thing happens on the Right flank and I loose more leaders!

I decide Hell, or Hot Water I'm going for it!

Napoleon goes for "Total Victory" nothing less.

"Glamour Shot" lol. If you live in the U.S. you know what I mean? They had them at every Mall.

Quite possibly the Red jacket was a "Bad Omen"?

And so it becomes a mess by turn 6. Troops rout. I can't Rally them. The Austrian Center is defeated eventually, but I can't pursue.

And with no chance to Rally my Morale falls below the alloted 80% level to (68%) for Victory!

Napoleon's "Quest for 1st Victory" comes to a grinding halt by turn 6.

The Left flank falters as well and is pushed back loosing a leader as well.

By turn 7 it appears we're "Losing the Battle"!

And so my Victory is lost!!

As my Left flank disappeared!

My Right get's torn up too!

A broader view of the "Carnage & Glory"!

Ibid!

"Red as far as the eye can see" all of my charges fail everywhere and I'm pushed back. Not only that, I lost every attached leader as well on turns 4, 5 & 6. WTFO? Meaning not only was I screwed, I was totally screwed as I had not enough leaders to effectively RALLY and lead my troops with. And so in a matter of minutes all was lost! LESSON LEARNED: "A determined smaller force can put up a good defense"

I was saddened that my Red jacketed "Napoleon" was defeated in his first attempt on the "Field of Battle", but found comfort when researching the battle that he was not to be the only one (See Link);


The ridge along which the French drove back the Austrians at the beginning of the battle of Montenotte, seen from the vantage point near Casa Bianca. It was from this place that Bonaparte observed the first movements of the troops. Monte Negino is the small "pimple" that can be seen just to the right of centre.

Tom's AAR summarizes my anguish with this game, lol.  --- Thought you would be interested in how the second game went.

I played the Austrians and Chris the French.  I did a variation of the StClair defense but strengthened the road defense in case the LaHarpe Division made a direct attack along the road.  This is exactly what Christ did with supporting attacks against Austrian positions on Monte San Giorgio.  Fortunately for the Austrians, Chris made numerous French single battalion assaults, (I did what I could, lol)  which were battered by the massed Austrian fire, but led to progressive Austrian fatigue.  The same approach was taken at the Bric Menau choke point.  In the end, Austrian fatigue was able to out last losses of French morale from casualties.  The game ended in the Phyrric Austrian victory, but when considering the Austrian victory conditions of maintaining a field presence (five of 8 battalions in somewhat good condition, whith one possibly threatened on turn 8 - last turn) and the French morale collapse at (68% with a game limit of 80%), (Austrians were at 77% with game limit of 75%), the results swung to a major victory.  We played seven turns in about four hrs for a major conclusion!

BOTTOM LINE; We both had fun.

STATISTICS;
Division Argenteau
  [501] Feldmarschall-Leutnant Argenteau - Active C+ [800 paces]
                [ 520] Sec/Arty Btty 2/9 Reserve                     5/73 [ 3]             C+      Good    Tired           (Honors)
   
Brigade Rukavina
    [503] Generalmajor Rukavina - Active C+ [400 paces]
    [Y]      [507] 1st/ IR44 von Preiss                            152/350                  C         Broken  Exhausted
              [509] Bn/ IR 16 Terzi                                       19/544                  C  [sk] Good    Tiring
              [510] Bn/ IR 50 Stein                                      16/659                  C  [sk] Good    Tired
    [Y]      [511] 2 Cos/Freiwilligers Grenz                    86/112                   C  [sk] Broken  Exhausted
    [R]      [512] Bn/IR 49 Pellrgrini                             88/450                    C         Broken  Exhausted
    [D]      [505] Bn Gun/IR 44                                     50/3                        C         Broken  Tired
               [516] Bn Gun/IR 50                                     0/55 [2]                   C         Good    Acceptable
   
Brigade Sebottendorf
    [504] Generalmajor Sebottendorf - Active C+ [400 paces]
                [508] 2 Cos/Gyulai Freikorps                       9/171                    C  [sk] Good    Acceptable
                [514] Bn/IR 19 Alvintzi                                0/520                     C        Good    Fresh
                [515] Bn/IR 52 Erzherzog Antoine           29/ 861                    C         Ex'lent Tiring
                [517] Bn Gun/IR 52                                     6/49 [2]                  C        Good    Acceptable
                [518] Bn Gun/IR 49                                     0/50 [2]                  C        Good    Tiring

Strengths:      losses/active
                           399/3667         Bayonets
                            61/230           Artillerists
                              2/9               Cannon
                          460/3897         Total of all arms
                                               6  Standards present


Division Massena
[106] General de Division Massena - Active A [1025 paces]

Division Laharpe
[102] General de Division Laharpe - Active B+ [950 paces]
[R]      [144] 1em/21 DB Ligne                          146/603               C+ [sk] Average Exhausted
[R]      [145] 2em/21 DB Ligne                          170/574               C+ [sk] Broken  Exhausted
[R]      [146] 3em/21 DB Ligne                           24/721                C+ [sk] Average Tired
[R]      [104] 1em/17 DB Legere                       161/ 332               B  [sk] Average Acceptable
           [105] 2em/17 DB Legere                         0/446                 B  [sk] Ex'lent Acceptable
           [106] 3em/17 DB Legere                       13/449                 B  [sk] Ex'lent Tiring        (Honors)
[D]      [110] Sqdn/7em Hussars                     121/0                     B- [sk] Average Acceptable
           [114] 3em Btty/6 Art a pied                  0/108 [4]            B-      Good    Tiring
[D]      [140] Converged Grenadiers             307/175                   B+ [sk] Broken  Acceptable
[D]      [121] 1em/14 DB (Prov) Ligne           184/315                   C- [sk] Broken  Acceptable
[R]      [122] 2em/14 DB (Prov) Ligne           123/379                   C- [sk] Broken  Tiring
[R]      [130] 1em/99 DB Ligne                        85/663                   C+ [sk] Poor    Tired
[D]      [131] 2em/99 DB Ligne                     299/455                    C+ [sk] Broken  Tiring
           [132] 3em/99 DB Ligne                        0/746                    C+ [sk] Good    Tiring
   
[108] General de Brigade Cervoni - Severely wounded             A- [550 paces]
[105] Chef de Battalion Pijon - Severely wounded                    A- [275 paces]
[104] Chef de Battalion Rondeau - Mortally wounded             B+ [250 paces]
[109] General de Brigade Fornesy - Lightly wounded                 B [450 paces]
               
Regiment Menard
[103] Chef de Battalion Menard - Active A- [275 paces]
             [101] 1em/8 DB Legere                                  13/506                  B  [sk] Ex'lent Fresh
             [102] 2em/8 DB Legere                                    0/501                  B  [sk] Ex'lent Fresh
             [124] 1em/70 DB Ligne                                   49/489                 C+ [sk] Good    Tired
[Y]        [125] 2em/70 DB Ligne                                  223/318                C+ [sk] Poor    Tired
             [ 126] 3em/70 DB Ligne                                 88/451                 C+ [sk] Good    Tired
   
Company Banel
[110] Capitaine Banel - Active B- [225 paces]
[113] 2 Btty/6 Art a pied              30/  73 [ 4] B-      Good    Acceptable

                Strengths:
                                losses/active
                                  1885/8123       Bayonets
                                    30/181           Artillerists
                                     0/8                Cannon

                                  2036/8304       Total of all arms
                                            7  Standards present

Monday, August 29, 2011

My new 2nd gaming space!

It's been over a year since I tragically lost my home to arson, but good things come to those who wait they say! Just wanted to share with you all and thank you for your encouragement and support! Cheers,


Chris


My main gaming area!


Ibid.


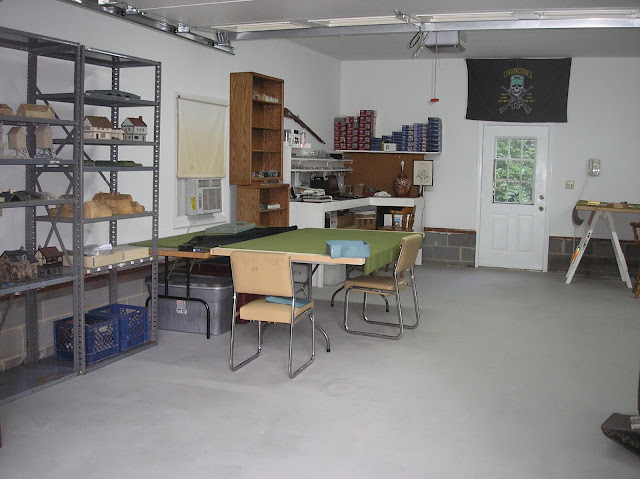
And my NEW 2nd area. The tables are deceiving! They're actually 6-1/2' x 4' and a 7' x 3'.

My work / research / storage area. Notice my old "RANGER" flag. 

Scenery storage space!

One gaming area that can be pulled out 12' x 7'. With A/C.


Ibid


A  second improvised table 6 1/2; x 4'. More tables chairs coming soon means more table area space for any size gaming.


Some artwork done by a friend over 30 years ago! Along with music speaker!


Ibid


My armies to be assembled and my old hand made "1976 Revolutionary War" reenactment musket!


Home sweet home.


Now to get gaming! "Mess with the Best, Die like the Rest"