Sunday, June 5, 2011

Miniature Wargaming 101 - Mounting!

Mounting

Once your figures are painted, or mostly painted, you will often need to mount them on bases. For infantry figures this is a fairly easy process. The set of rules you use will give the dimensions for the bases, and all you need to do is either cut bases out of thin sheets of balsa wood, or buy pre-cut metal bases. Some gaming rules use individual figures for combat, and so the number of figures attached to each base may be important. Other gaming rules use bases for calculating combat results, and in those cases, the number of figures attached to each base doesn't usually matter. For naval models, painting the base dark blue with white dappling patterns for the wake adds a realistic effect. Below are shown an assortment of miniatures of various scales and periods. This gives some idea as to appearance and final mounting technique, which can vary greatly.

Above is a closeup photo of the 1/3000 scale French battleship Carnot. Painted in her late Victorian era black and ochre livery. The model has been mounted on a thin styrene plastic base, with water texture added using Vallejo Pastic Putty. The plastic putty surface (which is fast drying) was then painted dark sea blue with some various white highlights, and then generously finished with a gloss sealer. As with most gaming miniatures, this model was received as a raw, unpainted pewter casting. For those not fond of the idea of actually painting, there are countless painting services available worldwide.

Above are shown two "levels" of paint jobs for 15mm Napoleonic infantry. The top level would be considered a good, average "wargame grade" paint job for these Austrian line infantry. The bottom photo shows how a good professional painter would paint some French guard infantry. Note the detailed shading and facial highlights.

This article is courtesy of;


Copyright © 2009 by The War Times Journal at www.wtj.com. All rights reserved.
All games shown here may be freely downloaded for personal use only. Not for resale or any other commercial venture not authorized by The War Times Journal.

Miniature Wargaming 101 - Painting!

Painting


Painting figures can be divided into four steps: deburring, temporary mounting (holding), priming and painting. We will cover each step separately, discussing supplies and equipment, basic steps and recommended techniques. We cannot recommend how many figures you should attempt to paint all at once, since figures vary in size and type (infantry, naval, aircraft, etc.). But most people paint anywhere from 10 to 30 infantry figures at a time, depending on the sizes of units being used in the rules they play. Painting one figure at a time is not advised, since your brushes are probably not cheap, and the repeated cleanings which come as a result of such small groups will shorten the life of your precious commodities!
Deburring - When you first buy your figures, they will often have bits of metal left on them from the molding process. These will have to be removed before you prime the figures.

Equipment: X-acto knives (large and small), nail clippers and sandpaper.
How to: Use the shearing strength of the nail clippers to remove the largest chunks and easy to access pieces. Then use the X-acto knife to clean up the detailed areas, and for infantry bases, to slice the bottom of the base smooth. In the case of metal tank models which need to be assembled, forming the tread segments or at least examining them for consistent form is advised. Make sure to use a small X-acto knife to clean up the basic outline of infantry figures, in case there is flashing along the parting lines (where the mold halves met).

Temporary Mounting - Instead of trying to hold onto each miniature separately as you try to paint it, it is common to temporarily mount miniatures on small disposable chits, sometimes even the cardboard chits out of board games. My preferred method is to use the extra wide wooden popsicle sticks sold at most craft supply stores. Instead of gluing the miniatures in place, I use clear adhesive glue-dots which are also sold in most craft supply shops. 15mm human figures can readily be lined up three or four per stick for easy holding and access. Also, the wooden sticks double as good paint palettes.

Priming - If you paint figures without primering them, it will usually cause a number of different problems. The colors of the paint will not be as vivid, and the paint itself will come off easily unless sealed. Some very finely detailed models can be painted without primering by using two thin coats of paint, followed by careful sealing. For most infantry and land war figures, primering is advised since they will be handled a lot. In the case of plastic figures, primering is more important to give the figure some extra resistance against flexing (which causes paint to chip off). Make sure to wash plastic figures in a strong solution of detergent before attempting to prime and paint them.

Equipment: For metal figures, Floquil primer is highly recommended. For plastic figures whose paint jobs are somewhat more at risk, a less expensive primer used for utility painting is probably fine. Do not use automobile spray primer on plastic figures, as it can melt them. Always test prime a single figure and check the results.
How to: Priming figures is fairly simple. Find a large, flat piece of material such as cardboard or an aluminum pizza pan, line of your figures up on it, and take it outside (Remember to paint outside, or in a well ventilated area, no huffing on the job!). Shake the primer can very, very thoroughly before you spray. Also allow each side of the figure to dry before flipping it over to spray the other side. Priming your figures in warm weather, or under warm conditions, is best. If the weather is really bad, then buying a bottle of brush-on primer and painting it on may be the best solution.

Painting - The two most important items you will need for painting will be paint and brushes. You should try to buy the best possible paints and brushes because the results of your labor will be better rewarded. Cheap brushes do not coat evenly, they shed their bristles onto your work and their tips quickly curl over into imprecise hooks. They also do not last very long, and you end up having to spend more money anyway. Cheap paint has less pigment and leaves things looking uneven and washed out.

Equipment - Paint: There are two types of paint; water-based acrylic, and oil-based enamel. Water based paints are by far the easiest to work with, because you can clean up the brushes using water. Water clean-up also extends the lives of those expensive little brushes. Some of the best known paint manufacturers for miniatures are Citadel, Vallejo Model Colors and Testors. If buying the later, make sure to buy their Model Master series and not their cheap "department store" level paints which are not really suitable for gaming miniatures. Make sure to seal your completed work with a good clear seal coating. The best to use is Krylon UV-Resistant Clear Acrylic Coating.

Equipment - Brushes: Many people use a combination of "throw away" synthetic brushes for unimportant work, and good quality kolinsky brushes for high value precision paint work. Of the later, the best brushes you can buy are the Da Vinci Maestro series of Winter Kolinsky brushes. They are outstanding quality and have long bristles that extend deep into the ferrule, which prevents the brushes from pulling out during cleaning and also makes for a longer lasting brush. If the Da Vinci are too expensive, there are several lines of sable and taklon brushes made by Loew Cornell which also work well, and they are much more widely sold at major craft supply stores than Da Vinci. Buy at least five or six different sizes of brushes, from tiny to medium-large, and keep a small cup of water and paper towels and toilet paper nearby for cleaning them. Never leave your brushes .

How to #1: The first painting example is of a French infantryman for the Napoleonic Wars. A World War Two figure will use much the same technique, except that the variety of colors used will be different. Begin by painting the one or two most dominant colors present on the model, in this case the white pants and lapel and the dark blue tunic. Once these basic colors are painted, you should next paint the areas which are recessed, and therefore most likely to be painted over. So for an infantry figure, you might want to paint in this order: pants/tunic, face, rifle/boots, backpacks/bags, headgear, straps, hands, buttons, etc. After you paint your figures, coat them with a light coat of Krylon UV-Resistant Clear Coat, remembering to shake well before using. This takes away the glossy effect of some paints (who ever saw a glossy paratrooper?) as well as protecting your paint job against heavy handling. Make sure not to use a glossy sealer, as this will leave a thick layer of shiny muck on your freshly painted figures!
NOTE! It has come to our attention that some people purposefully coat their figures with gloss sealer because they enjoy the shiny depth that the gloss coat lends to the appearance of the finished figures. It should fairly be noted here that a heavy gloss coat does indeed accentuate the vividness of paint schemes, especially those for periods already known for brightly colors uniforms like the Napoleonic, Seven Years War and others.

How to #2: For ship models (both historical and sci-fi) you should start by painting the basic hull color. Some ships, such as those from the turn of the century, have elaborate painting schemes which require careful painting, or at least attention to what colors the various section of the ship were painted. Painting the deck and other hull details almost last usually works well. For this, use a flat brush, with strokes going outward, from inner edge to outer edge. Trying to paint the deck along the edge (down the length) of the ship usually results in an uneven border. As before, coat finished vessels with a coat of Figure Flat sealer.

Miniature Wargaming 101 - Miniatures!


Miniatures;
Most gaming miniatures fall into a few categories based on two basic factors: materials and scale. The question of materials is simple, since most gaming miniatures are made of metal or plastic. Metal miniatures are usually more attractive and durable. Plastic miniatures are cheaper, but the paint-job degrades over time as the flexible plastic allows chipping of the paint. The question of scale is more complex and requires some explanation. Most gaming scales are expressed using one of two standard methods: fractional and metric. Each standard of scale has it's own normal area of usage which we will outline below:

Fractional: Most lines of miniatures designed on a fractional scale standard will be centered on man-made devices, such as tanks, ships, planes, trains, etc. The fractional scale system works just like it sounds. The scale refers to the difference in size between the model and the real thing. So a 1/2400 scale battleship model will be 1/2400th the size of the real life ship. This means that the 863 foot long battleship Yamato would be about 4.3 inches long in 1/2400 scale (863 ÷ 2400 = .36 feet). Some of the more common fractional scales and their common applications are:


The most common fractional land war scales in use today are 1/76th (which corresponds to the metric 20mm scale) and the 1/287 and 1/300 "micro-armor" scales (which correspond to the 6mm metric scale). The most common air war scales are 1/72 for WWI combat, and 1/300 scale for other periods. The most common naval gaming scale is 1/2400, with the new 1/6000 rapidly closing in as a very popular scale for WWI combat and later.

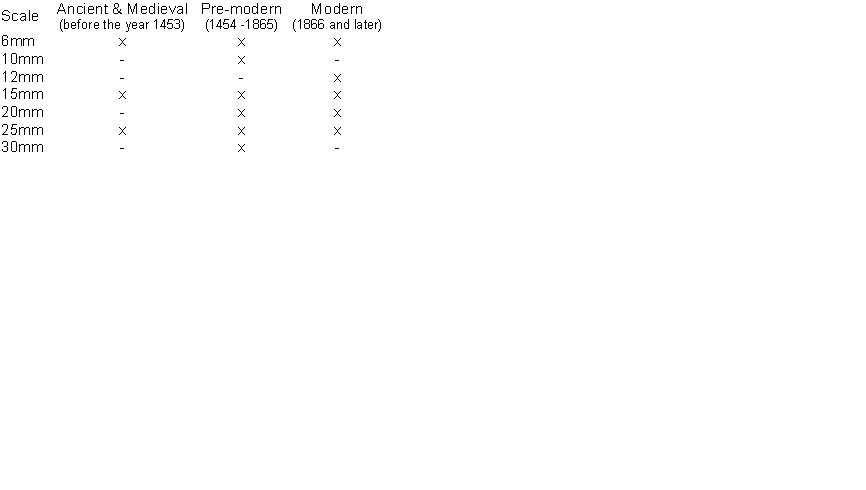
Metric: Most metric gaming scales emphasize recreating the human form, hence the wide use of the metric scale models for use for land based combat. In this system, the scale refers to the height of a single human. So a 20mm scale model series will be based on the calculation of a scale human figure being roughly twenty millimeters tall. However, different model designers use different measurement standards to design their figures. Human figures are always created mounted to a small base, and some designers include those bases in the overall height. Others do not. The result is a wide variation in size, even among theoretically identical scales. For example, the very common 15mm figure range features some manufacturers who offer figures whose scale "humans" are only 13½mm tall, whereas some other makers of 15mm figures offer miniatures whose scale humans are nearly 18mm tall! The variation when placing two such differently designed figures side by side is very noticeable. This is why we offer a WTJ "Man Height" standard, which measures from the top of the base (bottom of the scale figure's feet) to the approximate top of the scale figure's head. This offers a rough standard which allows comparison of figures from different designers. The chart below offers a rough outline of the most common metric scales and a few related periods of land warfare.


As can be seen, the most common scales used are 15mm and 25mm. The second most common are 20mm and the 6mm "micro" scale, which corresponds to the 1/287th and 1/300th scales. 10mm and 12mm are new scales which are increasing in popularity due to their combination of economy and detail. Since the main designers of 10mm figures design their figures slightly oversize, and the current designer of 12mm figures design figures which are very slightly undersized, both scale are currently very compatible with each other. Maybe they should get together and rename the scale 11mm!

Miniature Wargaming 101!

I saw this excellent article years ago and kept a copy (It's somewhat longer than the current version) and thought I'd share it with you as I feel it's of value to both the novice beginner and the seasoned Grognard!

Miniature Wargaming 101
Introduction - Miniatures - Painting - Mounting


Introduction

What is miniature wargaming? Miniature wargaming is when you use scale models or figures of real-life people or equipment to recreate battles from some period in history – or even the future. This is done with the help of rules which are used to create the actual conditions of movement, casualties and morale.
Miniature wargaming rules range from simple to complex, depending on the goal of the rule designers. Complex rules usually move at a slow pace and require a lot of work, but the way combat plays out will closely match the results of real life combat. Simple rules can move at a faster pace and require less work, but they will be less concerned with historical accuracy for the various game steps or final results. These later rule types emphasize fast and enjoyable game play.

This is well known as the "Speed versus Accuracy" issue, which most designers resolve by creating a modestly accurate system that can be learned by most people. A solution used at WTJ is to speed up game play by abstracting mid-turn combat elements, while still assuring that final results are accurate. This hybrid approach has proven very popular.

Because there is no international standard for rating the complexity of miniature wargaming rules, it is up to individual players to decide for themselves which rules are too simple or complex for them. Rules used to be sold almost exclusively through hobby stores, but the advent of the Internet has brought a huge new selection on-line, some of which cost money and some of which are free.

So the two most important items for gaming are rules and figures. The rest of this section will address the issue of figures and how to prepare them for use. The actual process of painting figures and playing wargames is fairly simple, but where to begin can be a difficult decision. The best way to begin is to choose a period or story type which you find interesting. Your best incentive for historical gaming will be the reading of eyewitness accounts and narratives for the battles you re-create, so if you are already interested in the subject, it helps a lot. For science-fiction or fantasy, then the books or computer games themselves will usually be your best sources.

Another valuable thing to remember is that your interest in gaming or in a particular genre of gaming will vary over time. If you seem to lose interest in a particular period, don't worry about all those miniatures you bought. Humans thrive on variety, so you will probably develop interests in several different genres of gaming, and will bounce around from one to the other, alternately putting away and pulling out batches of miniatures to fill your most recent interest. You would be surprised at how many people I know who sold their stuff only to get back into it again a year or two later. Never get rid of your stuff, rotating interests is a normal thing.

Once you decide on a genre that interests you, contact local players or gaming groups which put on games for that period (if you have not gamed before). Try to play with more than one group so that you have variety in the games played. Beware of isolated groups made up of people who argue too much, or groups who have individuals that are allowed to capitalize on everybody else's time (a problem common to all hobbies). Wargaming involves a hefty investment of your time, and you should invest that time wisely with people or groups who are easy going and interesting. Most players and gaming groups are great, and they will usually have established miniatures and rules for game play, which will give a good clue as to which figures you want to buy and paint. This leads us to the subject of the miniatures themselves.

Saturday, June 4, 2011

The Battle of Arcole, or Battle of Arcola (15–17 November 1796)!


Title: Battle of Arcole
Start Time: 11:30 am
Host: Tom Garnett
Rules: Carnage and Glory II (Computer assisted)
Scale: 28 mm
Number of Players: 6 Table Size: 10’ x 6’

Event Description:
Battle of the Bridge of Arcole
Part of the French Revolutionary Wars
Arcole vernet.jpg
Napoleon Bonaparte leading his troops over the bridge of Arcole, by Horace Vernet.
Date15 to 17 November 1796
LocationArcole, present-day Italy
ResultFrench victory
Belligerents
France FranceHabsburg Monarchy Austria
Commanders and leaders
Napoleon BonaparteJózsef Alvinczi
Strength
20,000[1]24,000
Casualties and losses
3,500 dead or wounded
1,300 captured or missing
2,200 dead or wounded
4,000 men & 11 guns captured
The Battle of Arcole, or Battle of Arcola (15–17 November 1796), saw a bold manoeuvre by Napoleon Bonaparte to outflank the Austrian army under József Alvinczi and cut its line of retreat. This French victory occurred during the third Austrian attempt to lift the Siege of Mantua during the French Revolutionary Wars

You can see more on the siege of Mantua here;

Siege of Mantua, 1796-97: Vauban's Wars playtest

http://blundersonthedanube.blogspot.com/2011/05/siege-of-mantua-1796-97-vaubans-wars.html

Arcola 1796 Campaign Order of Battle

In the Battle of Arcola on 15 to 17 November 1796, the French Army of Italy commanded by Napoleon Bonaparte won a victory over the army of Austria led by Jozsef Alvinczi. The battle was part the third relief of the Siege of Mantua in which Alvinczi's army repulsed Bonaparte at the Second Battle of Bassano on 6 November and at the Battle of Caldiero on 12 November. Meanwhile, Paul Davidovich's Austrian Tyrol Corps clashed with Claude Vaubois' French division at Cembra on 2 November. Davidovich defeated Vaubois at the Battle of Calliano on 6-7 November and Rivoli Veronese on 17 November. After Bonaparte's triumph at Arcola, he turned on the Tyrol Corps, beat it at Rivoli on 21 November, and forced it to retreat north into the mountains.

Infamous General Brian surveys the field asking "What's a Dyke, and how the Hell does one move on these things?

Arcole -- the dyke This view shows the dyke along which General Augereau's division had to advance in order to try and cross the bridge, which is just to the left of the camera

On Saturday, June 4th, I had the privilege of attending the game of Arcole/Arcola at the NOVAG Games Day in Chantilly, VA. The game was originally scheduled to be the "Battle of Rivoli" as I mentioned in a previous post, but was rescheduled due to time constraints. Once again Tom Garnett provided everything and was an excellent host and GM. He even treated me to dinner after the battle was over.  It doesn't get more gracious than that! The scenario was for the third day of the battle;

Third day

On 17 November, Alvinczi withdrew Hohenzollern to Caldiero, closer to his main body. Again, Provera held Belfiore while Mittrowsky defended Arcole. During the night, Bonaparte's engineers floated some pontoons into the Alpone where they built a bridge near its mouth. Augereau's division crossed the bridge and began fighting its way along the eastern dike. A French battalion and some cavalry also set out from Legnago and joined Augereau later in the day. Meanwhile, two of Masséna's demi-brigades led by BG Jean Robert attacked along the western dike.

By early afternoon, Masséna drubbed Provera near Belfiore again. Alvinczi recalled both Provera and Hohenzollern toward the east and began feeding some of the latter's troops into the combat at Arcole. There, the battle went back and forth all day. At 3 pm, a large column of Austrian reinforcements surged out of Arcole and drove back the troops under Robert. Augereau's men on the east bank saw this development and also fell back. By 4 pm, Augereau's rattled division pulled back across the pontoon bridge to the west bank.

Just when the day seemed lost, Masséna appeared with reinforcements from the western flank. With these, he ambushed the Austrians on the western dike and sent them reeling back toward Arcole. Heartened, Augereau's men recrossed to the east bank of the Alpone and renewed the fight. Masséna and Augereau finally battled their way into Arcole around 5 pm. A lieutenant and 25 Guides aided the final attack by riding into the Austrian rear area and blowing several bugles to create the impression of a large force. The French followed up their success by advancing north and threatening to block the main east-west highway. Alvinczi threw in Schübirz's brigade to hold off the French, and this allowed Provera's division to escape.

French Army


Napoleon Bonaparte

Austrian Army


József Alvinczi

Arcole / Arcola initial Austrian positions!

Arcole -- the bridge The modern bridge at Arcole, looking over the Alpone to the village itself.

The famous bridge along the dykes leading from Arcole (The French Left Flank)!

A view of all the dykes leading to the city. I'll command the Left Flank under Massena, while General Brian commands the Right Flank.
 
The River Alpone at Arcole The Alpone seen from the bridge at Arcole, looking northwards. The narrowness of the watercourse may not be obvious from the picture. Taken on a grim day in June.

The view from the Austrian lines. (Initial setup)

A view from General Brian's positions.

My troops first move ending positions on the dyke. 

A closer view of Tom's beautiful troops which are a pleasure to play with.

The Austrians prepare to defend!

General Brian's troops (Augereau) come up to skirmish first turn.

As reinforcements come up the dyke, bringing much needed guns!

Popular lore;


This action of the 1796 Italian campaign concerned much more than the crossing of a bridge, though the bridge tends to figure largely in paintings of the battle, usually for dramatic reasons. It seems likely that the paintings that show Bonaparte actually crossing the bridge owe more to artistic interpretation than fact. Not that being on the bridge itself would have been any more heroic: several of the men standing around Napoleon at the time were killed and wounded, and he was extremely lucky to escape unharmed, though according to one source he was toppled from his horse and ended in the mud at the edge of the marsh. Bonaparte's aide-de-camp, who was killed on the first day of the battle, later had the French frigate Muiron named after him.

STAY TUNED FOR MORE!........


Wednesday, June 1, 2011

“Recommended” by Miniature Wargames!

The June edition of Miniature Wargames contains a review of Wellington's First
Battle. A copy of the review is available on my website;


Thanks

Garry Wills


bookcover

Wellington’s First Battle – Combat for Boxtel is the first book by Caseshot Publishing, a new company owned by this work’s author Garry David Wills. This well-written account of Wellington’s first ever action will correct you in an entertaining way if you believed he fought his first battles at Assaye and Seringipatam against the Moguls. The spotlights on other characters present at this “minor affair” in Holland make good reading as do whole chapters devoted specifically to wargaming the battle using Black Powder and Volley & Bayonet. The bullet points pages turned me off but they would be a useful ready reference when actually wargaming.

  miniwar  

There are plenty of quality atmospheric photos featuring the author’s 15 mils plus maps and sidebars – including one on the origin of the British infantryman’s nickname “Tommy”. It would be easy to dwell on the unfortunate fact that Arthur Wellesley is referred to as “Wesley” throughout the book. It would be kinder and more appropriate to say that the more I read, the more I liked it. Recommended, though that really depends on your reaction to the price tag (ᆪ14.99), as the battle is rather obscure.”
 
(Review by Steve Eardley in Miniature Wargames, No. 338, June 2011)
models  

Wellington’s First Battle tells the story of the Duke of Wellington’s involvement in his first campaign, the Duke of York’s defence of Belgium and Holland in 1794 and early 1795. During this campaign, the Duke of Wellington fought his first battle, the combat of Boxtel on the 15th September 1794.

The Duke of Wellington is rightly considered a “great commander”, arguably Great Britain’s greatest soldier. It is surprising therefore that so little has been written about his early career and the formative experiences of war that guided him in his rise to greatness. Historians past and present have naturally focussed on the Wars of Napoleon rather than those of the preceding Revolutionary period. However the French Revolutionary Wars witnessed the art of warfare in arguably a greater state of flux than the later Napoleonic period and provided the training ground for all the great soldiers who fought for and against Napoleon.

In August 1794, while Napoleon languished in prison in Fort Carré near Antibes, the focus of the war was more than five hundred miles away to the north in the Netherlands, where Revolutionary France’s largest and most powerful armies fought the combined forces of Austria, Great Britain and the United Provinces.
The man who would become the Duke of Wellington, Field Marshal in several countries, had departed from Cork as Sir Arthur Wesley, Lieutenant-Colonel of the 33rd Foot, the regiment that would later bear his name. Wesley and his regiment joined Lord Moira’s force and travelled to Ostend in order to reinforce the army of the Duke of York. The second half of 1794 provided Wesley with his first active service on campaign, in which he found neither fame (his name is not mentioned in any of the contemporary accounts of Boxtel) nor fortune, but he did gain experience.

 Wellington’s First Battle is the story of a small part of that campaign..
Wellington’s First Battle is a high quality 64 page booklet in full colour, illustrated with campaign and battlefield maps. Wellington’s First Battle provides accounts of the campaign and the battle based on detailed research of both contemporary and firsthand accounts. 

Wellington’s First Battle includes fully detailed orders of battle and an historically accurate map of the battlefield to enable the wargamer to recreate the great Duke’s first action under enemy fire using either a generic scenario or specific scenario information provided for the popular rulesets, Black Powder, Volley & Bayonet and General de Brigade.

Wellington’s First Battle is based on high quality research and includes full details of all sources used.

links1

A proportion of the proceeds from this product will be donated to the Project Hougoumont charity, as part of the “Chosen Man” scheme.